

Complete Guide to Running Software Instruments Live
Learn how to choose, organize, control, and rehearse software instruments for dependable live performance.

Software instruments can work reliably on stage, but a live setup needs a different kind of preparation than a studio project. The goal is not to carry every plugin into the show. It is to build a small, tested system with predictable sound recall, clear controls, enough headroom, and a recovery plan.
This guide covers the decisions that matter: which instrument roles the show needs, how to organize sounds by song, how to use MIDI and automation, and how to test the complete rig before performance.
What a live software-instrument setup needs
A dependable setup should make five things clear:
- which instrument or layer is active;
- how the performer changes sounds;
- which controls are manual and which are automated;
- how much CPU and latency headroom remains; and
- what happens if a plugin, preset, device, or connection fails.
Use fewer sounds than in the studio when that makes the show easier to understand and test. Keep names, songs, sections, and controls consistent. Treat every plugin, preset, mapping, and update as part of the performance system.
Start with the roles your show actually needs
Begin with the set rather than the plugin folder. List the sounds required for each song, then group them into practical roles: primary instruments, layers, effects, transitions, and song-specific parts. This clarifies what must be recalled together and what can remain optional.
For each role, decide whether the change happens manually, through MIDI, or through automation. Use the method the performer or operator can understand and repeat under stage pressure. Avoid controls that depend on remembering which window, track, or plugin happens to be open.
Choose instruments you can operate on stage
Sound quality is only one selection criterion. Check recall behavior, CPU demand, latency, stability, format compatibility, and the way the instrument responds to the controls you actually use. Test the complete chain on the computer and interface that will be used for performance, not only on the development system.
Do not add a new instrument shortly before a show simply because it sounds promising. A smaller, rehearsed collection is usually more useful than a larger collection whose presets, authorization, performance load, or mappings have not been tested together.
Where Arco Live fits
Arco Live is Sonicraft’s native macOS song-based live-performance environment with integrated DAW capabilities. It is built for workflows that combine software instruments and effects, song organization, MIDI, automation, audio and MIDI tracks, arrangement, playback, routing, and live-performance preparation.
That makes it relevant when a performer needs more than a plugin window. The challenge is usually to recall the right sounds for each song, manage layers and performance slots, control changes predictably, and keep the complete system playable and reliable under stage conditions.
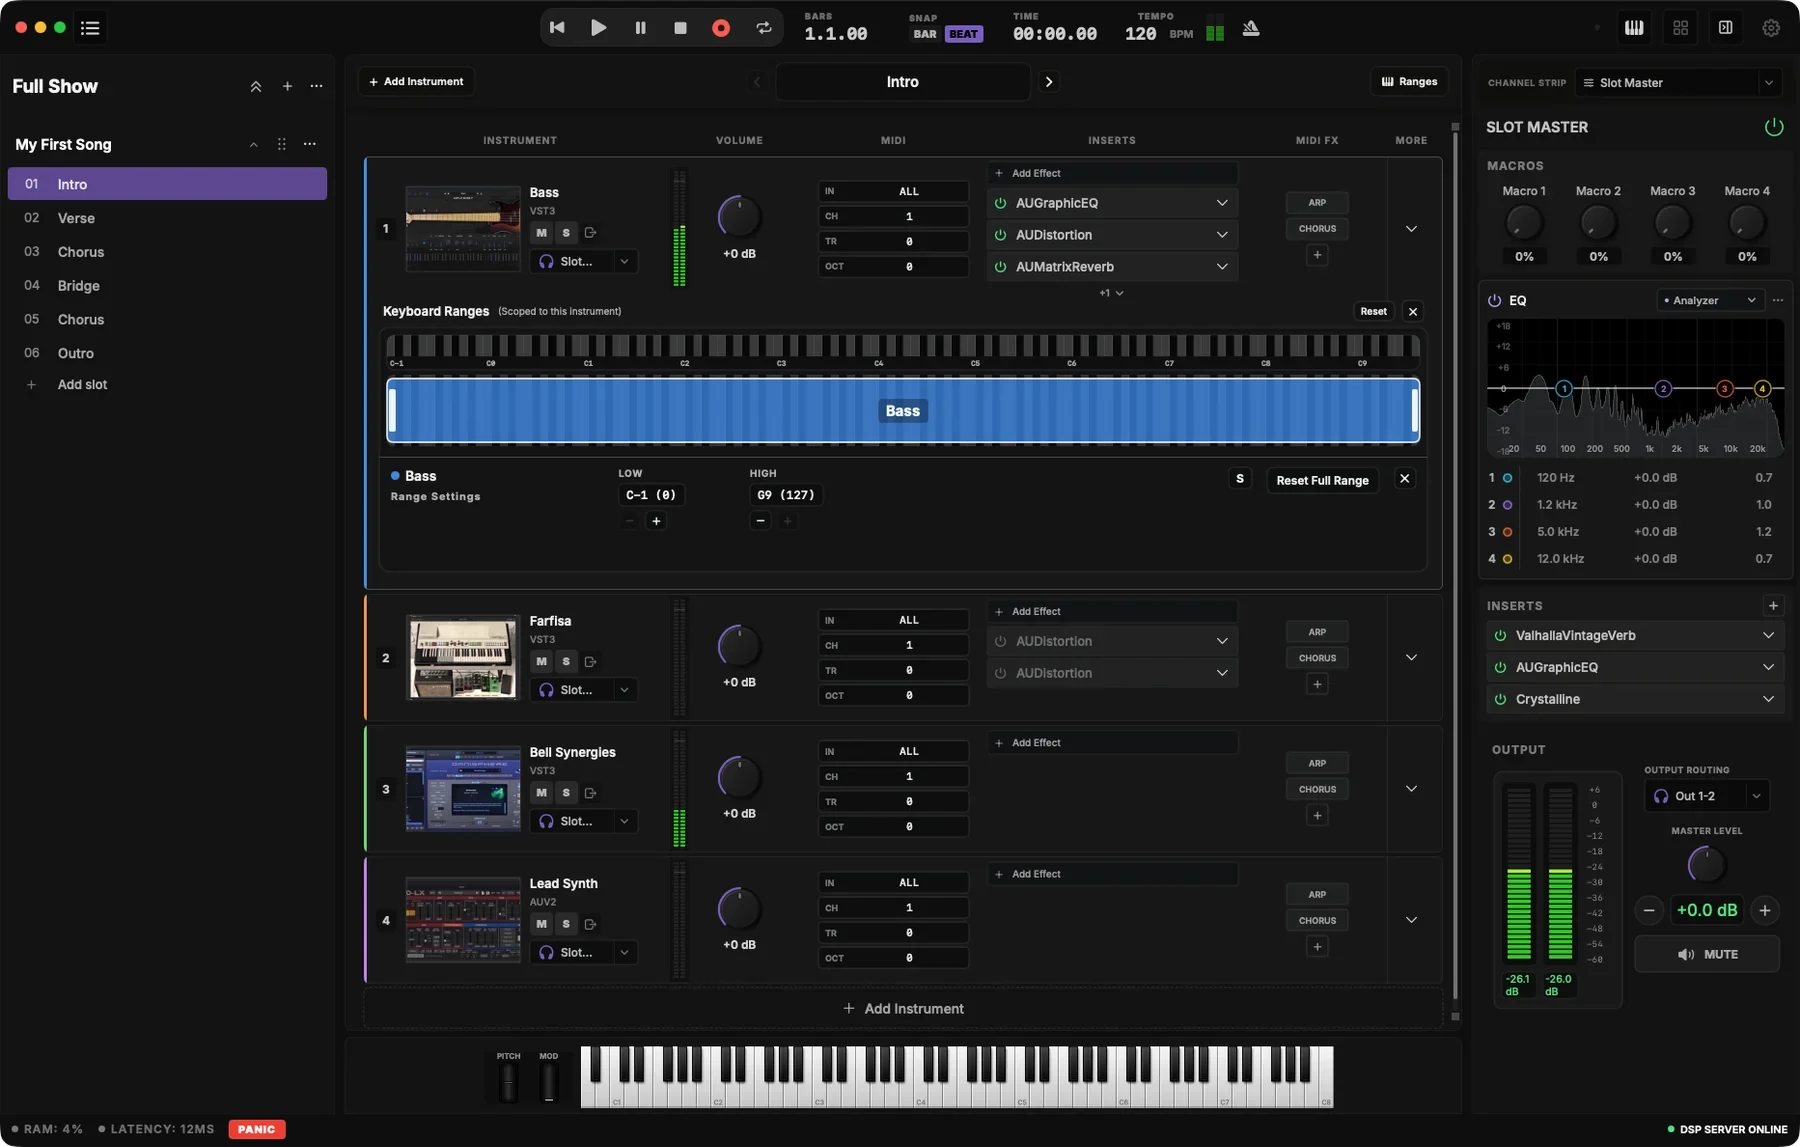
The instrument view shows how a song-based setup can keep performance decisions in one place. The left side organizes the song into sections such as Intro, Verse, Chorus, Bridge, and Outro. The main workspace contains multiple instrument slots, including Bass, Farfisa, Bell Synergies, and Lead Synth, with visible plugin formats, MIDI settings, effects, and keyboard ranges. This type of organization is useful when a performer needs to move between a primary sound and supporting layers without rebuilding the setup for every section.
Arco Live also includes DAW-style audio and playback workflows. Its DAW view can be used for audio tracks, arrangement, editing, effects, automation, and playback inside the same song-based environment.
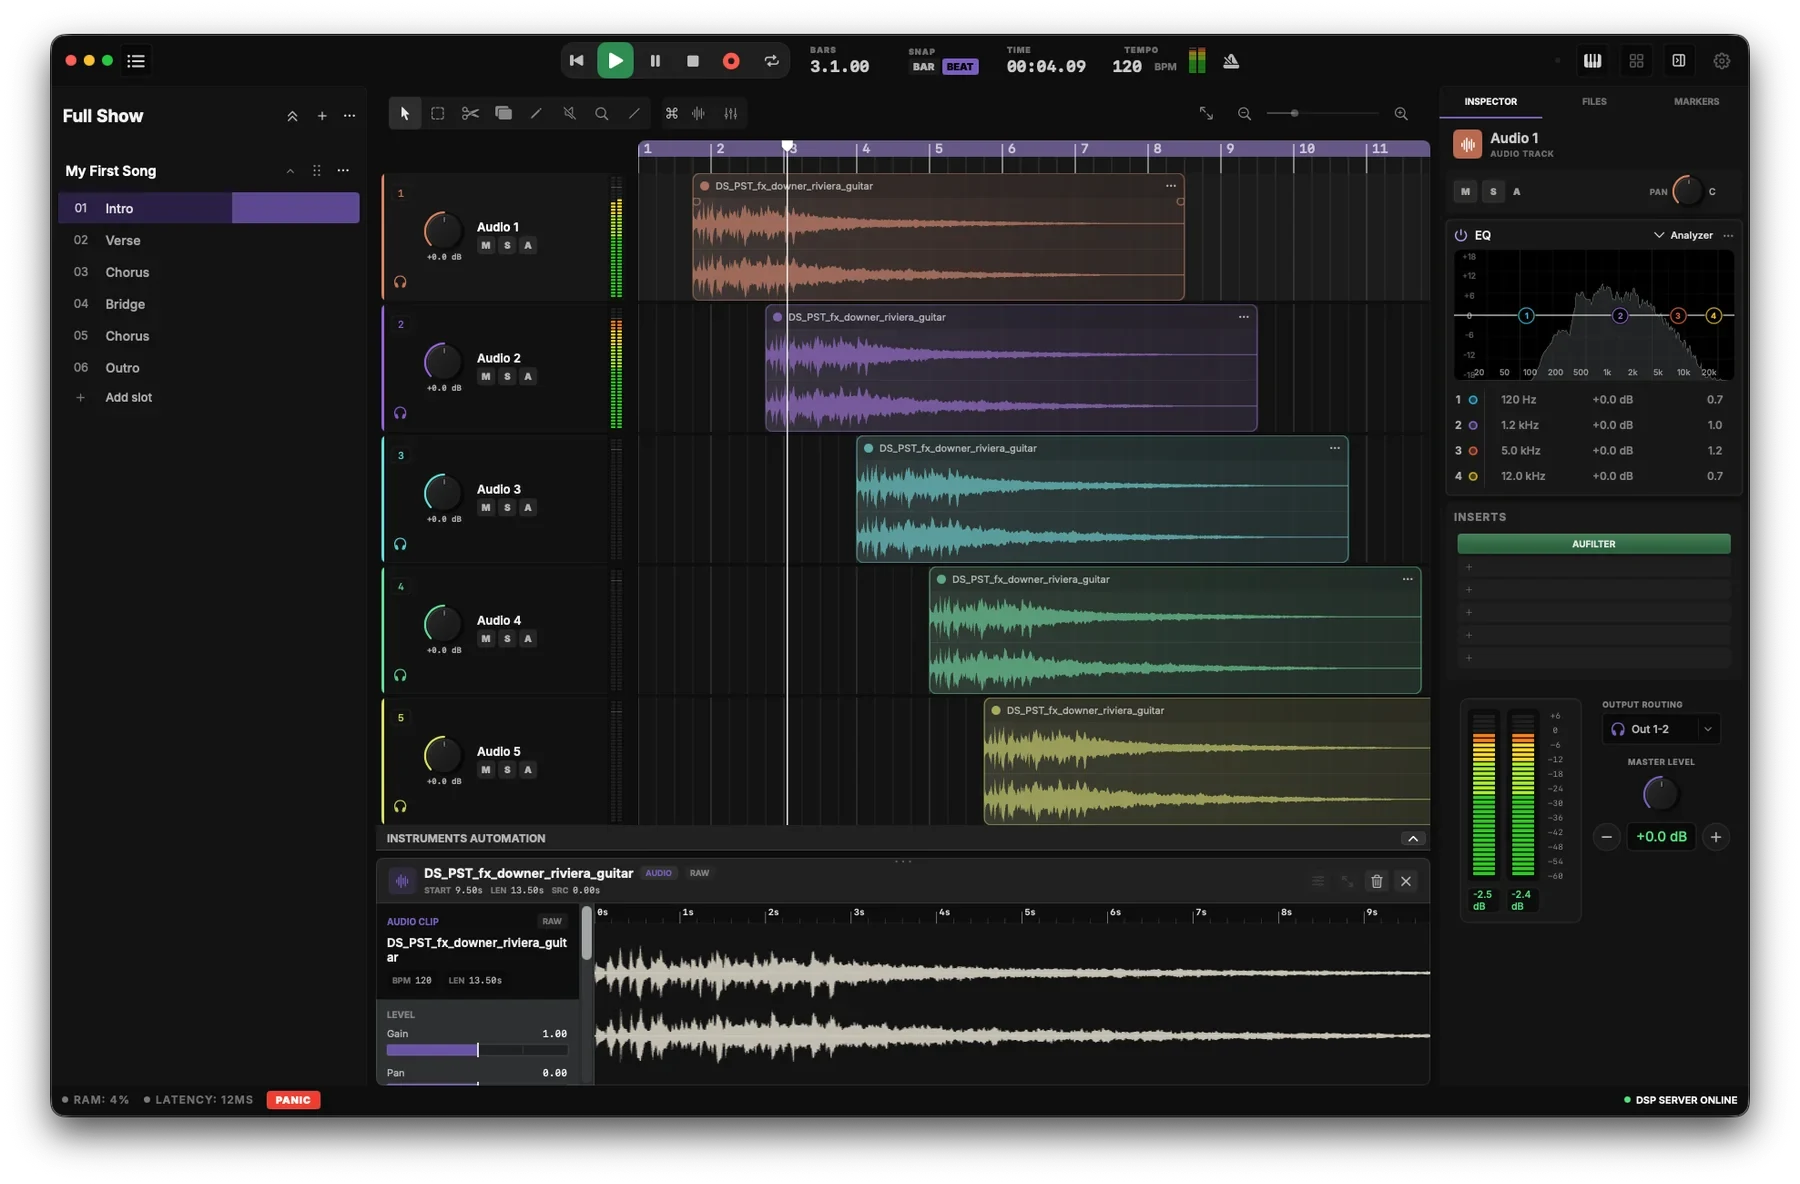
The two views illustrate the distinction between preparing sounds and running arranged material. A live setup may need instruments in one song, audio playback in another, or both at different points in the show. Keeping those workflows connected can reduce the number of separate projects and operating contexts the performer has to manage.
The screenshots also show RAM and latency readouts. Those values are examples from the displayed project, not fixed performance promises: CPU load and latency depend on the computer, interface, plugins, project, buffer settings, and routing. They should be checked as part of rehearsal.
Organize sounds around songs and performance actions
Once the instrument roles are clear, organize them around the way the show is actually performed. A useful structure answers three questions quickly:
- What song or section is active?
- Which instrument, layer, or effect is needed now?
- What action changes the setup for the next moment?
Song-based organization is usually easier to operate than a single, undifferentiated collection of sounds. Use consistent names for songs, sections, slots, patches, and important controls. Keep the same naming logic across rehearsal and performance versions so that a last-minute correction does not create a second, confusing system.
Layers should have a reason to exist. A bass layer, pad, lead, or effect can be useful when it supports a musical role or a planned transition. It becomes a liability when the performer has to remember an arbitrary combination of muted, soloed, bypassed, and active instruments for every song.
If the setup uses performance slots or snapshots, document what each one contains and when it is used. A slot should describe a musical action, not only the name of a plugin. “Chorus lead with pad” is more useful during a show than an internal preset name that only makes sense in the studio.
Use MIDI and automation deliberately
MIDI and automation are valuable when they remove repetitive manual work and make a change repeatable. They can be used for sound changes, layer changes, parameter movements, effects, and other actions that need to happen at a known point in a song.
Start with the smallest control system that solves the problem. Map only the actions that the performer or operator actually needs. Every mapping should have a visible purpose, a predictable result, and a rehearsal step. If a control is difficult to explain, difficult to test, or easy to trigger accidentally, simplify it before adding more automation.
Keep manual and automated responsibilities clear. For example, the performer may choose when to move to a new song section, while automation handles a repeatable effect change inside that section. The exact division depends on the show, but the operator should always know which actions are safe to change and which are part of the fixed arrangement.
Balance latency, CPU, and reliability
Instrument choice is also a performance-load decision. A plugin can sound excellent and still be a poor choice for a live rig if it creates too much CPU load, introduces too much latency, behaves unpredictably when combined with other plugins, or depends on a configuration that has not been tested at the venue.
There is no universal buffer setting that works for every instrument rig. Lower latency can improve playability, but it also reduces the time available for the computer to process audio. Larger projects, layered instruments, effects, and automation can change the balance. Test the exact project with the exact plugins, interface, sample rate, buffer setting, and connected controller that will be used on stage.
Leave headroom. Do not plan the show around a system that is already close to its limit during a quiet rehearsal. Test the busiest song, the largest layer combination, the most demanding effect chain, and the transitions that change several things at once. Watch for crackles, dropouts, sluggish controls, unexpected preset changes, or sounds that take too long to become ready.
Plugin format is part of the preparation decision as well. Audio Units and VST3 can both be useful, but the important question is whether the chosen format is stable, compatible, recallable, and properly tested in the actual live environment. Keep the detailed format comparison separate from this broader workflow.
Rehearse the complete instrument rig
Rehearse the system, not only the music. Use the same computer, interface, controller, project version, plugins, presets, and output connections planned for the show.
Run the set in order and test every change that matters:
- moving between songs and sections;
- changing instruments, layers, and performance slots;
- triggering MIDI or automated actions;
- playing the most demanding combinations;
- checking the performer’s monitoring and main outputs; and
- recovering from a deliberately introduced problem where it is safe to do so.
Do not make the first full-system test at soundcheck. A rehearsal should reveal whether the structure is understandable, whether the mappings are reliable, and whether the computer has enough headroom for the entire show. After the system passes, preserve a known-good version and record what changed when a new plugin, preset, mapping, or project edit is introduced.
Prepare a practical fallback plan
A fallback plan does not need to reproduce every detail of the main setup. It needs to protect the important musical moments and give the performer a clear next action when something fails.
For a performer whose main sounds come from software, a dedicated keyboard with built-in sounds can provide a simple instrument fallback. It will not replace every layer, effect, or programmed change, but it can keep essential parts playable while the primary system is recovered.
For shows that depend on both backing tracks and software instruments, a redundant playback system is the more complete approach. The backup should be capable of taking over the backing tracks as well as the instrument side of the performance, with matching projects, plugins, presets, mappings, audio files, and output assignments. If Arco Live is part of the main rig, include a tested Arco Live version in that redundant setup so the backup can preserve the important software-instrument and playback workflow rather than covering only the tracks.
Identify which sounds are essential, which layers can be removed, and which effects can be bypassed without stopping the performance. Keep the tested project and its supporting files together. Make sure the person operating the rig knows which version is current and which version is the known-good fallback.
The best fallback is one that has been rehearsed. If the team has never practiced changing to a reduced instrument setup, it is not yet a reliable recovery procedure.
Pre-show checklist
Before the show, confirm:
- The correct song and project version is loaded.
- Every required instrument and effect is available.
- Presets, layers, slots, and sections are named clearly.
- MIDI mappings and automation produce the expected changes.
- The most demanding songs have been tested.
- Latency and CPU headroom are acceptable.
- Controllers, interfaces, and output routing are connected correctly.
- Monitoring and main outputs have been checked.
- A known-good backup is available.
- The performer or operator knows the fallback procedure.
Related resources
The Ableton Live for Live Performance guide covers a different but related workflow: preparing and operating Ableton-based playback systems on stage. Future supporting resources in this cluster will cover software keyboard-rig design, AU versus VST3 selection, and detailed buffer, latency, and CPU decisions.
If your live setup needs song-based organization, instrument layers, MIDI control, and integrated DAW workflows in one environment, Arco Live is built for that kind of performance system.